Showing posts with label diy. Show all posts

Wednesday, June 20, 2012

Granola Bars


So with the upcoming move we have decided that we need to get rid of some of the excess food that we have in the house. This means finding something to do with all of the junk that we have acquired over the past two years. In my venture to do so I have made "pudding pops" out of milk and Nutella (at 138 calories per popsicle, they aren't bad), fudge (it was a crumbly mess and I will not post about it...), oatmeal/raisin cookies, and now I am working on Granola bars.

I have done some researching on the internet, commonly referred to as my brain (running joke with one of my girlfriends), and I have come up with a recipe similar to that of the one on the King Arthur Flour website. It goes as follows:

1 1/2 C oats
1/3 C oat flour (I just blended my oats in my handy dandy Vitamix)
1/4 t. ground cinnamon
dash of nutmeg (I add this to just about any recipe that calls for cinnamon, I think that it complements the flavor, I LOVE IT)
3 C of fruit/nut mix (with this batch I used: raisins, dates, figs, and almonds)
6 T. butter
1/3 C peanut butter, or any nut butter
1/3 C honey, or maple syrup
1 T vanilla extract
1 T water

Preheat the oven to 350 F, and cover a 9x9 or 8x8 pan with wax paper or parchment paper.

Combine all dry ingredients in a medium sized bowl.

In a small saucepan, melt butter and add the rest of the "wet" ingredients. Once heated through and melted together pour over the dry ingredients and mix well.

Pour all of it into the pan and bake for 30-35 minutes. Cool on the counter for 20-30 minutes and then place in the refrigerator.
excuse the knife...

Cut into bars to serve. The granola bars can be kept for up to a week, but I doubt they will last that long.

Tuesday, June 19, 2012

Father's Day

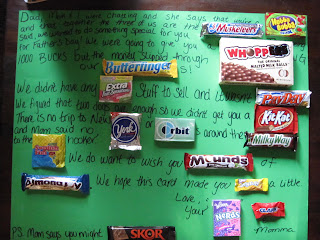
I am really excited about Father's Day this year. It is the first Father's Day for Travis and Clark and I so I am working on some gifts for Daddy. Yesterday I purchased a bunch of Candy Bars to use on a poster to tell a story, totally got the idea from Pinterest (man do I waste some time on that website), and I made salt dough to make footprint imprints for Travis. I had extra dough left over so I invited the neighbor children to come over and make their father a gift too. Here is what we came up with:

I know it is difficult to read so here is what it says:

Dad, Mom and I were chatting and she says that you are a "Hubba Bubba" and that the three of us are the "3 Musketeers". That being said, we wanted to do something special for you for Father's Day. We were going to give you a "whoppers"ing 1000 bucks but the money slipped through our "butterfinger"s! We didn't have any "extra" stuff to sell and it wasn't "payday", we figured that two dogs were enough so we didn't buy you a "KitKat", there is no trip to New "York" or "Orbit"s around the "Milky Way", and Mom said no to the "Swedish Fish" hooker. We do want to wish you "mounds" of "Almond Joy". We hope this card made you "Laffy Taffy" a little. Love, your "nerds" "Clark" and Momma
 P.S. Mom says you might "Skor"

Cute, right? Travis liked it.

I hope that you all had a great Father's Day.

Saturday, May 19, 2012

Homemade Yogurt

Finished product, it is so creamy.

Last night I made homemade yogurt. I was really worried about how it was going to turn out or if it would turn out at all but low and behold I woke up this morning and it was done.  Not only was it too easy to do but it was cheap! I made 64 ounces of organic yogurt for the price of buying five yogurts that have who knows what added to them. Oh yeah, I’m doing the happy dance!

To make your own you will need:
½ gallon of milk (I used organic that was on sale for ½ price)
2.5 TBSP of starter yogurt (use plain yogurt with active cultures. Once you make your own yogurt you can use that as your starter)
1 double boiler or pot
1 casserole dish (with lid)
1 candy thermometer
Cheese cloth (optional)


Heat to 180
Cool to 110


Save 2 TBSP of milk in a bowl. Heat the remaining milk in the double boiler / pot until it reaches 180 degrees Fahrenheit (continually stir the milk to keep from burning). Remove from the burner and pour into the casserole dish, let cool to 110 degrees. While the milk is cooling, mix the 2 reserved TBSPs of milk with the starter yogurt. Turn your oven on to warm or 100 to heat it up. Once the milk has cooled, add the starter yogurt mixture and mix well, place the lid on the casserole dish, cover with a dish towel and place inside the oven. Turn the oven light on (for heat), turn the oven off, and let the milk sit overnight or 8 hours. In the morning you will have yogurt!

Cover and let sit 8 hours

TOO EASY!!! There are some substitutions that you can make if you don’t have an oven light that produces heat; you can place the casserole dish in a cooler and seal it to keep the yogurt warm. If you want to have greek yogurt then you can strain your finished yogurt through a cheese cloth (layered into 4ths) removing the whey and creating a thicker product.

 I hope that you enjoy it as much as I do!

 Do you have any recipes for homemade treats that are healthier to make than they are to buy?


Thursday, May 17, 2012

Homemade Chicken Stock and Shredded Chicken

I started making chicken stock from scratch a few months ago because I want to decrease the amount of processed food that we buy, I want to know what goes into our bodies, and I figured that I could also tweak it to suit our taste. I WAS RIGHT! Homemade chicken stock is so much better than the stuff that you buy off of the shelf, you know, that could last a nuclear blast (what do they put in that stuff?).

After searching the Internet, and perusing a couple of different recipes, this is what I came up with. My recipe will yield 7 quarts of stock and three baggies of shredded chicken. I made three batches this weekend so now I've got enough stock and chicken to get us through the next few months. YAY!

So here is how I make my Chicken Stock:
1 5lb chicken                     
2 onions (peeled and quartered)             
3-4 carrots (halved)        
4 celery stalks (with leaves, cut into thirds)                                        
1 head of garlic (halved crosswise)
2 TBSP Kosher Salt          
1.5 TBS whole peppercorns                        
15 stalks of flat leaf parsley
15 stalks of dill                  
15 stalks of thyme                                          
15 stalks of cilantro                                                                                         
28 cups of water
Assemble ingredients
Put it in the pot


Place all of the ingredients into a HUGE stockpot and bring to a boil, reduce to a simmer for 1-2 hours (depending on how long it takes the chicken to cook, sometimes I use a fresh chicken and other times I use a frozen chicken so it takes longer). Once the chicken is cooked remove it from the pot and take the meat off of the bones. (I just put the meat into a bowl and set it aside to shred later) Replace the carcass into the pot and continue to cook for 2 hours.
Once you turn the heat off let the pot cool, strain the liquid through a colander and let cool the rest of the way on the counter. Once the stock has cooled to room temperature, place in the refrigerator overnight to chill completely. The next day remove the fat from the surface and then divide the stock into the size that you need.
I know this looks gross but at least it is no longer in the stock.
I put mine into quart size bags and freeze them. You can use the stock immediately or you can freeze for up to three months.
Ready for the freezer.
Do you have any great freezer meals that are your go to life savers?

Wednesday, May 16, 2012

Entertainment for Baby

I have been going out of my mind to find ways to entertain Clark day in and day out, so I decided that I would make him flash cards. I was trying to find a way to make a game of them or something and this is what I came up with:

Alphabetical flash cards on construction paper in “bubble” letters so that he can color them in (once he has the dexterity to do so),they are laminated so they are reusable. The colors of the paper are in the order of the color spectrum. You know, ROY-G-BIV. (Side note: I also organize my closet this way. Yep, I’m OCD like that.) I put the capital letters on one side and lowercase letters on the other. Clark does really well with paying attention as I go through the alphabet, he looks at the letter as I show it to him and he watches my mouth as I say the letter out loud. I also tell him what sound the letter makes, “A says Ahhh, B says Buhh, etc.” He will usually sit for three rounds before he wants to eat the cards.

I also made him some memory cards. The memory cards are either gray (ay is the preferred American English spelling, ey the rest of the English speaking world, just saying…) on one side with a basic word written on them (such as Mom, Dad, Dog, Moon, etc.) and then colored strips with a letter of the alphabet on it, or they are white with a dashed word on them for him to practice writing (I get that it will be quite some time before that happens but these are mini versions of the big cards for travel purposes) and the same colored strips on the other side. I figure we can take these cards with us when we go out to eat or are traveling, to keep Clark entertained. The basic words are so that he can get used to word recognition.

I can’t wait to finish my next project for you to see…

Do you have any recommendations for entertaining baby?

Friday, April 20, 2012

Easter

This was my first Easter as a mommy. I LOVED IT!!! Clark is still too little to actually dye the eggs himself or to hunt for eggs but that didn't stop us...


I made Clark his first Easter basket:
First I had to make the inner rope. I cut plastic bags and taped them together with masking tape.

Next I wove the inner rope together using cut strips of fabric that I had on hand from another project that I'm working on for Clark.


Once I finished the basket project we were free to dye eggs.

And the highlight of all his waiting:

Thursday, November 3, 2011

Passing the time...


Clark is still cooking and so am I...

Yesterday I made chicken and dumplings from a recipe that I got off of Bubblecrumb http://www.bubblecrumb.com/2010/02/14/crock-pot-chicken-and-dumplings-recipe/. I should really learn how to hyperlink on here... Hmmm, work in progress.

The day before I spent the day embroidering two pillows for Clark. It was my first time attempting embroidery, I think I did a pretty good job. I have no idea what my next project is going to be, I need to condtinue to work on the color book that I've been attempting to put together for quite some time now.

We've got another doctors appointment today to check on Clarks progress. I have to admit, I seriously thought that I would want to keep this little guy in forever but as the days pass and the contractions keep coming and getting stronger, I am ready to have this little guy. Last night I had multiple contractions that took my breath away and then nothing. So this morning Buddy and I are going to go for a nice long walk and see if we can get some progression.

I hope that you all are having a great week!
J